[Fixed] BSOD Error 0x00000133 on Windows 10
The 0x00000133 is also known as DPC_WATCHDOG_VIOLATION bug check. In this article, we provide you 6 methods to fix this error.
Last Updated: 2 years ago

When you are web-surfing, you may meet the 0x00000133 blue screen error. The 0x00000133 is also called DPC_WATCHDOG_VIOLATION bug check. In most of the cases, the error is caused by hardware problems and driver issues.
It’s a common error but no need for you to worry about, this error should be easy to fix. Read on to find how.
Back to normal system
The first thing to do when you meet the 0x00000133 error is to restart your computer and back to the normal Windows system.
How: Usually the system will restart automatically. But if your computer freezes, you can hold your Power button for about 5 seconds to restart it.
If you can’t reboot your computer into normal mode in this way, you can click here to know how to boot into safe mode. After that, restart your computer to see if the system has returned to normal.
6 fixes for 0x00000133 blue screen error:
Method 1: Change SATA AHCI controller driver
Change your Family SATA AHCI Controller into Standard SATA AHCI Controller can help you solve this problem.
1) On your keyboard, press the Windows logo key and R at the same time, then type “devmgmt. msc” and press Enter.

2) Expand IDE ATA/ATAPI Controllers. Right-click SATA AHCI controller and click Update driver.

3) Click Browse my computer for driver software.

4) Click Let me pick from a list of device drivers on my computer.

5) Click Standard SATA AHCI Controller, then click Next. Then follow the on-screen instructions to finish the process.

6) Restart your computer and then check whether the blue screen will appear or not.
Method 2: Update your driver
One reason for the 0x00000133 error is outdated drivers for your hardware devices. You should verify that your devices have the right and latest drivers, and update those that don’t.
There are two ways you can get the right drivers: manually or automatically.
Manual driver update – You can update your driver manually by going to the manufacturer’s website, and searching for the most recent correct driver. Be sure to choose only drivers that are compatible with your Windows version.
Automatic driver update – If you don’t have the time, patience or computer skills to update your driver manually, you can do it automatically with Driver Easy. Driver Easy will automatically recognize your system and find the correct driver for your device, and your Windows version, and it will download and install it correctly:
1) Download and install Driver Easy.
2) Run Driver Easy and click the Scan Now button. Driver Easy will then scan your computer and detect any problem drivers.

3) Click the Update button next to the selected driver to automatically download the correct version of that driver, then you can manually install it (you can do this with the FREE version).
Or click Update All to automatically download and install the correct version of all the drivers that are missing or out of date on your system. (This requires the Pro version which comes with full support and a 30-day money back guarantee. You’ll be prompted to upgrade when you click Update All.)

4) Restart your computer and check the blue screen problem is fixed or not.
Method 3: Rollback your driver
When you meet the blue screen error, you check your drivers and find they’ve already updated to the latest version. In this case, you have to make sure they are compatible with your system. It’s because sometimes the latest version of device driver doesn’t work properly on your system and start interfering with the computer’s normal start-up process.
So, roll back your driver to the previous version to solve the issue.
In the steps below, we use the graphics driver as an example to demonstrate. You can follow the steps to roll back the driver you think needs to be rolled back.
1) On your keyboard, press the Windows logo key and R together to invoke the Run box.
2) Type “devmgmt. msc” and click OK.
3) In the Device Manager, click the Display adapters, then right-click on your display device software and click Properties.

4) Under the Driver tab, click Roll Back Driver, then follow the on-screen instructions to finish the process.

5) Restart your computer, and see if the blue screen error is fixed or not.
Method 4: Repair system files
When your computer’s system file was broken or corrupted, it may cause the blue screen error.
To solve it, you can use System File Checker (SFC) to repair the broken system files.
1) On your keyboard, press the Windows logo key and R key at the same time to invoke the Run box.
2) Type “cmd” and press Shift+Ctrl+Enter together to open Command Prompt in the administrator mode.

3) Type “sfc /scannow” in the window and press Enter. Then wait for the verification is 100% complete.

4) Restart your computer to check the blue screen error is fixed or not.
If the result indicates that there are broken files exists but SFC can’t fix it, you can turn to Deployment Image Servicing and Management (DISM) Tool for deeper examine and repair.
Click here for a tutorial on how to use the DISM Tool.
Method 5: Repair hard disk errors
In some cases, the 0x00000133 blue screen error could be attributed to hard drive corruption.
Check Disk Utility(chkdsk. exe) is a useful tool offered by Windows that can be used to check the hard drive for bad sectors and fix them if possible. Here’s how:
1) On your keyboard, press the Windows logo key and R key at the same time to invoke the Run box.
2) Type “cmd” and press Shift+Ctrl+Enter together to open Command Prompt in the administrator mode.
3) Type the following command line and press the Enter key on your keyboard.
Note: The letter “x” means the disk drive that you want to scan and repair for. If you want to scan and repair C disk, replace “x” with “c”.

4) After the scanning and repairing process is done, restart your PC and check to see if the blue screen error is resolved.
Method 6: Restore your system
If you can’t figure out which software or driver cause this blue screen error and your computer was fine a few days ago, you can restore your system back to a previous restore point.
This will roll back all the device drivers and software updates to the condition when you created the restore point.
1) On your keyboard, press the Windows logo key + Pause together, then click System protection.

2) Click System Restore.

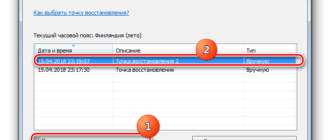
3) Click Next and it will open the below window.
Choose a restore point where the Windows didn’t show any errors. Then follow the on-screen instructions to finish the process.

4) Restart your computer to check the blue screen will appear or not.
We hope you find these techniques useful. You’re welcome to leave comments and questions below.
Ошибка 0xc0000135 в Windows 10 — как исправить
Если при включении или перезапуске устройства с Windows 10 вместо нормальной загрузки на рабочий стол, вы столкнулись с 0xc0000135 ошибка, то этот пост предназначен для вас. В этом посте мы расскажем о наиболее эффективных решениях, чтобы исправить эту проблему и быстро настроить свое устройство.

Ошибка приложения 0xc0000135, STATUS_DLL_NOT_FOUND — (Невозможно найти компонент). Это приложение не запустилось, потому что %hs не был найден. Повторная установка приложения может решить эту проблему.
Другие возможные причины включают следующее:
Как исправить ошибку приложения 0xc0000135
Если вы столкнулись с этой проблемой, вы можете попробовать наши рекомендуемые решения ниже в произвольном порядке и посмотреть, поможет ли это решить проблему.
Если вы можете войти в систему как обычно, хорошо. В противном случае вам придется загрузиться в безопасном режиме, перейти на экран дополнительных параметров запуска или использовать установочный носитель для загрузки, чтобы выполнить эти инструкции.
1] Запустите онлайн средство устранения неполадок синего экрана
В попытке исправить любую ошибку BSOD лучше всего сначала запустить средство устранения неполадок синего экрана в и посмотреть, решит ли это проблему.
Посетите сайт Microsoft, чтобы начать работу. Вы увидите простой мастер, который проведет вас через процесс устранения неполадок синих экранов.
Сначала вас спросят — когда вы получили ошибку синего экрана?
Если вы выберете При обновлении до Windows 10, вам будет предложено вернуться к предыдущей версии Windows, так как установка уже не делает этого автоматически.
Если вы выберете После установки обновления, вам будет предложено проверить наличие обновлений или удалить недавно установленное оборудование.
Если вы выберете При использовании моего ПК, вам будут предложены некоторые полезные предложения, если вы сможете перейти на свой рабочий стол, а также, если вы не можете получить доступ к рабочему столу.
Средство устранения неполадок довольно простое и предназначено для помощи пользователю в решении этой обременительной задачи по исправлению ошибки синего экрана.
2] Выполните восстановление при загрузке
Если вы уже выполнили автоматическое восстановление при загрузке, но проблема не решена, вы можете попробовать автоматическое восстановление с установочного носителя Windows 10.
Вот как:
Обратитесь к производителю ПК (или обратитесь к руководству, прилагаемому к ПК), чтобы узнать, как изменить порядок загрузки компьютера. Вам придется сменить загрузочное устройство на USB-накопитель.
На любом работающем ПК создайте (если у вас его нет под рукой) установочный USB-накопитель с Windows 10. Вы можете создать установочный носитель Windows 10 на компьютере с Linux или Mac, если это то, к чему у вас есть доступ.
Когда закончите, извлеките установочный носитель и перезагрузитесь и посмотрите, появится ли ошибка синего экрана 0xc0000135 снова. Если да, попробуйте следующее решение.
3] Устранение неполадок в состоянии чистой загрузки
Ненужные системные и кеш-файлы, процессы, службы, существующие или запущенные на вашем компьютере, могут вызвать эту ошибку.
Чтобы войти в состояние чистой загрузки, введите MSConfig в поиске и нажмите Enter, чтобы открыть служебную программу настройки системы. Щелкните вкладку Общие, а затем щелкните Выборочный запуск.
Чистая загрузка выполняется для запуска Windows, используя минимальный набор драйверов и программ автозапуска. Это помогает устранить конфликты программного обеспечения, возникающие при установке программы или обновления или при запуске программы в Windows 10.
4] Обновите устаревшие драйверы устройств
В некоторых случаях эта ошибка BSOD, как и другие, появляется после установки обновления Windows. Если это так, вероятно, один из драйверов вашего устройства больше не поддерживается новой версией/сборкой ОС Windows 10. Итак, вам нужно обновить драйверы.
Вы можете обновить драйверы вручную через Диспетчер устройств или получить обновления драйверов в разделе «Дополнительные обновления» в Центре обновления Windows. Вы можете скачать последнюю версию драйвера с сайта производителя.
5] Запустите сканирование SFC/DISM
Поврежденные системные файлы могут вызвать эту ошибку BSOD. Вы можете запустить сканирование SFC и посмотреть, поможет ли это.
https://www. drivereasy. com/knowledge/fixed-bsod-error-0x00000133-on-windows-10/
https://pcrentgen. ru/oshibka-0xc0000135/