[Solved] Install Realtek HD Audio Driver Failure on Windows 10
Most of the computer will use the Realtek High Definition Audio as an audio device. When you downloaded the latest version of Realtek HD audio driver from the official site and install it, it pops up an error “Install Realtek HD Audio Driver Failure!!“. And you may see different error code such as 0x80070020, 0xC0000374, 0x000000FF, 0x00000002, 0x0000000d, 0x00000005, etc.
When you enter the device manager, you will find the Realtek High Definition is missing or marked with a yellow exclamation. This means your Realtek HD audio driver is missing and encountering an installed error.
Obviously, this error is directly related to the driver, so the next solutions will be easier. Following to fix the Realtek driver installation issue and then successfully install Realtek HD audio driver for Windows 10.
Solutions:
Solution 1: Uninstall Realtek Audio Driver
If your Realtek audio driver installs failed, the installation process maybe is incomplete. So you need to uninstall it fully and then reinstall it again.
But before you dive into this Realtek driver error, you need to make sure the sound card on your PC is in good shape. It is understandable that Realtek audio driver won’t install if the PC sound card is dead. After checking the sound card, Realtek HD audio driver install failed remains, move on to reinstall it again.
2. Choose Program and Features.
3. Find the Realtek High Definition Audio Driver, double click to uninstall it or right-click to uninstall it.

4. Reboot computer. This will make this change to take effect.
5. Open device manager.
6. Click Scan for hardware changes.

This will help Windows reinstall the Realtek High definition audio driver again. But it is also common that Windows 10 device manager cannot help you install Realtek High Definition Audio driver smoothly, thus install Realtek HD audio driver failure coming to your PC. In this way, you are supposed to go ahead to fix this Realtek download error.
Solution 2: Update Realtek HD Audio Driver
After uninstalling Realtek audio driver and adding legacy hardware on Windows 10, you now should reinstall the driver again to see if Realtek audio driver failure can be removed by the updated audio driver.
Driver Booster can be the best driver updating tool if device manager is unable to install Realtek HD audio driver. It has 3 million-plus item database for the latest versions and it can also backup and restore your drivers, schedule automatic scans and uninstall unneeded drivers. All these functionalities are ready for you to fix install Realtek HD audio driver failure and the audio driver shows as Microsoft HD audio driver in Device Manager.
1. Download and install Driver Booster on Windows 10.
2. After running Driver Booster on your PC, attempt to hit Scan.

3. Then scroll down to locate and Sound, video and game controllers to Update it.

Soon after that, you will notice that the audio driver has been automatically updated. Even if the Realtek HD audio driver is missing, Driver Booster will detect and install it for you. With the help of Driver Booster, you will find reinstalling Realtek HD audio driver is simple and install Realtek HD audio driver failure can be fixed quickly.
It is also a thing of course that you refer to 3 ways to update Realtek HD audio driver for Windows 10 to get the details steps to install Realtek audio driver.
At this moment, you won’t hit upon installing Realtek HD audio driver failure as you can install the Realtek driver successfully.
Solution 3: Add Legacy Hardware in Device Manager
Sometimes, users fail to find the suitable driver or even can’t locate Sound, video and game controllers in device manager, if it is the case, there is much need to add legacy hardware before you go further to install the latest Realtek HD audio driver for Windows 10.
1. Head to device manager.
2. Click Action and then Add legacy hardware. Assuming you find there is only an option – Help under Action, try to hit the blank space in device manager interface.

3. Then click Next to add Sound, video and game controllers to device manager.

4. Choose to Search for and install the hardware automatically and then stroke Next to search for the hardware on Windows 10.

If there is any hardware missing on Windows 10 like Sound, video and game controllers, here you can find device manager has added it automatically.
Now it is high time that you managed to update and install Realtek HD audio driver so as to get rid of Install Realtek HD audio driver failure error code 0001.
Solution 4: Remove Conflict Drivers
We know the Microsoft UAA bus driver is an audio driver that supports the High Definition Audio devices. If you are reinstalling the Realtek High Definition audio driver, maybe it will conflict with the Microsoft UAA bus driver. So you can remove the Microsoft UAA bus driver and reinstall the Realtek audio driver again.
1. Open device manager and expand System devices, and you will see the Microsoft UAA Bus Driver for High Definition Audio. Right-click it to choose Disable.

2. Goes to the Program and Features to Uninstall the Realtek High Definition Audio Driver. This step is the same with the solution 1 uninstalling process. The system will remind you to reboot computer, do not reboot the computer.
3. Go back to the device manager, find the Microsoft UAA Bus Driver for High Definition. This time, right-click it to choose Uninstall to uninstall this driver. Of course, do not reboot your computer.
4. Reinstalling the Realtek High Definition Audio Driver. If it pops up a warning, ignore it.
And for reinstalling the audio driver, you can use the manual way. Downloading the latest version of Realtek audio drivers and installing it step by step.
In short, you can fix install Realtek HD audio driver failure on Windows 10 with the solutions above. One of them will help you install Realtek drivers properly.
Не удается проверить цифровую подпись драйверов (код 52) — Решение
При установке в систему какого-либо аппаратного устройства и соответствующих ему драйверов пользователь может столкнуться с проблемой работы последних, отображающихся в «Диспетчере устройств» с кодом ошибки 52. Данная ошибка связана с отсутствием у данного драйвера соответствующей цифровой подписи, из-за чего ОС Виндовс отказывает ему в поддержке. Ниже я разберу суть данной дисфункции, а также поясню, как исправить ошибку «Не удаётся проверить цифровую подпись» на вашем ПК.

Причины возникновения ошибки с кодом 52
Данная ошибка на каком-либо устройстве в Диспетчере устройств (или в «DxDiag») обычно сообщает пользователю, что Виндовс не смогла проверить цифровую подпись драйвера для данного компонента ПК. По этой причине Виндовс отказывается (или прекращает) работать с данным устройством, и даже может заблокировать возможность установки новых драйверов для проблемного девайса.
С данной ошибкой встречается множество пользователей, особенно часты случаи её появления на Виндовс 7. Указанная ошибка может быть вызвана множеством причин, начинает от инсталляции какого-либо специфического обновления, установки какого-либо некорректного или модифицированного драйвера и других релевантных факторов.

О наличии ошибки 52 обычно сигнализировать восклицательный знак на фоне жёлтого треугольника рядом с каким-либо устройством в «Диспетчере устройств». Переход же во вкладку «Общие» информации о данном устройстве информирует пользователя о наличии ошибки 52, связанной с отсутствием цифровой подписи у его драйвера.
Как исправить «Не удается проверить цифровую подпись драйверов (код 52)»
Специфика способов, позволяющих избавиться от ошибки 52, варьируется в зависимости от устройства, с которым у вас возникает данная проблема. Рассмотрим наиболее популярные и эффективные решения.
Способ №1. Удалите верхние и нижние ЮСБ-фильтры
Первый из данных способов касается решения проблемы 52 связанной с ЮСБ-устройствами. Необходимо удалить две записи реестра, также известные как «UpperFilters» и «LowerFilters», что позволит восстановить полноценный функционал вашей системы. Выполните следующее:
![]()
Способ №2. Деактивируйте проверку целостности
Запустите командную строку с правами админа, и в ней последовательно наберите следующие команды:

Если данные команды не помогли, и ошибка 52 продолжает наблюдаться, тогда вновь запустите командную строку, и там наберите:

Перезагрузите ваш ПК.

Способ №3. Отключите проверку цифровых подписей (для Виндовс 8 и 10)
Этот способ позволит вам инсталлировать драйера для проблемных устройств без проверки их подписи цифровым функционалом ОС Виндовс 8 и 10. Выполните следующее:
Не отжимайте указанную клавишу пока ПК не перезагрузится, и вы не увидите опции меню восстановления (Advanced Recovery Options). В нём выберите «Диагностика», далее «Дополнительные параметры», затем «Параметры загрузки», и здесь кликаем на «Перезагрузить». В открывшемся перечне опций необходимо выбрать опцию №7, просто нажав на соответствующую цифру на клавиатуре.

ОС Виндовс перезагрузится в данном режиме, и вы сможете легко инсталлировать ранее проблемный драйвер.
Способ №4. Удалите драйвера проблемных устройств
Перейдите в «Диспетчер устройств», нажав на Win+R, и набрав там devmgmt. msc. Найдите проблемный драйвер, наведите на него курсор, щёлкните ПКМ, и выберите «Удалить устройство» (или просто «Удалить»). Затем перезагрузите ваш ПК.

Способ №5. Временно отключите проверку цифровой подписи драйверов (паллиативный метод)
Эффективным (но непродолжительным) способом избавиться от ошибки 52 является выбор опции отключения проверки подписи драйверов при загрузке ОС Виндовс. Для этого в начале загрузки ПК быстро жмите на F8, и после того, как появится меню дополнительных параметров загрузки, выберите в самом низу опцию отключения проверки драйверов. Загрузите систему в данном режиме, и проблема с ошибкой 52 временно исчезнет.

Данный вариант имеет паллиативный характер, так как после перезагрузки системы в обычном режиме дисфункция возвратится вновь.
Способ №6. Задействуйте административные шаблоны
Нажмите на Win+R, там наберите gpedit. msc. Перейдите по пути «Конфигурация пользователя», затем «Административные шаблоны», далее «Система» — «Установка драйвера». Справа выбираем опцию «Цифровая подпись драйверов устройств».

Дважды кликаем на ней, и в появившемся окне слева выбираем «Отключено». Нажимаем на «Применить», и перезагружаем наш PC.

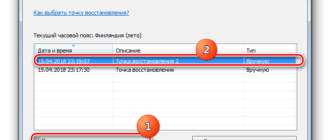
Способ №7. Используйте системное восстановление
Если вы не устанавливали недавно в систему каких-либо новых компонентов, тем не менее столкнулись с рассматриваемой в статье дисфункцией, рекомендуется выполнить системное восстановление. Нажмите Win+R, введите там rstrui, после чего нажмите на Enter. Выберите стабильную точку восстановления системы, и осуществите откат на указанное состояние.
Заключение
Возникновение ошибки «Не удаётся проверить цифровую подпись драйверов» может быть вызвано комплексом причин, как аппаратного, так и программного, характера. Рекомендуется воспользоваться всеми перечисленными выше советами, позволяющими решить ошибку 52 на вашем ПК.
https://tencomputer. com/install-realtek-hd-audio-driver-failure-on-windows-10/
https://rusadmin. biz/oshibki/ne-udaetsya-proverit-tsifrovuyu-podpis-drajverov-kod-52-reshenie/