4 Solutions to Fix Error Code 43 on Mac?
Get to know about the error code 43 on Mac and different ways to fix it. The guide has listed 4 different solutions to resolve the MacBook error code 43 easily.

Sue Wayne
Feb 02, 2021 • Filed to: Solve Mac Problems • Proven solutions

If you are a Mac user, then you might already know how smooth and secure the macOS is. Nevertheless, there are times when users encounter issues like error 43 on Mac. The error usually occurs when we try to delete some files or move them from one location to another. Since there can be different reasons for the macOS error code 43, it is important to diagnose the problem and troubleshoot it accordingly. In this post, I’m going to tell you what is error code 43 and how we can fix it.
Part 1: What is Error Code 43 on Mac?
While the macOS error code 43 can take place at any time, it is mostly observed while moving files from a USB drive. For instance, you can get the error code 43 USB on Mac while deleting some files from a pen drive or transferring them from the USB drive to your Mac storage.
You could be getting the error code 43 prompt on your Mac due to the following reasons:
Apart from this, any other issue related to the hard disk partitions or the macOS firmware can also cause the error 43 on Mac.
Part 2: How to Fix Error Code 43 on Mac?
As you can see, there could be all kinds of reasons for getting the error code 43 on Mac. Therefore, you can try some of these suggestions to fix error 43 on Mac, depending on its major cause.
Method 1: Fix the Mac Drive with Disk Utility
The easiest way to fix the Finder error code 43 is by using the Disk Utility application in Mac. It is an inbuilt application that can be used to scan your hard disk and repair it automatically. In case if a hard disk corruption has caused the MacBook error code 43, then this would be able to fix it.
Step 1. Firstly, you need to launch the Disk Utility application on your Mac. For this, you can just look up «Disk Utility» in the Spotlight search or go to Finder > Applications > Utilities > Disk Utility.

Step 2. Once the Disk Utility application would be launched, you can view various partitions and external drives on the sidebar. From here, select your Macintosh HD (the main storage of your Mac).
Step 3. This will enable various operations on the right that you can perform on your hard disk. From the toolbar, click on the «First Aid» button and choose to run the first aid scan on your hard disk.

Step 4. Agree to the prompt and wait for a while as your Mac would run the scan and tries to fix the error code 43 on Mac. In the end, you can view the results and restart your Mac to resolve it.

Method 2: Reset PRAM and NVRAM on Mac
Chances are that a firmware issue related to your Mac’s PRAM or NVRAM can also cause the error 43 in Mac. PRAM, which stands for Parameter Random Access Memory, stores details related to your system configuration, display settings, hard disk configuration, and so on. Similarly, NVRAM (Non-Volatile Random Access Memory) has details about the device, display, and other permanent system components.
If either PRAM or NVRAM has been corrupted in your Mac, then it can cause numerous issues – including the error code 43 USB on Mac. You can fix it by resetting the PRAM and NVRAM on your Mac by following these steps:
Step 1. Firstly, go to your Mac’s Finder and click on the «Shut Down» option to turn your Mac off.

Step 2. Wait for a while for Mac to get turned off and press the Power key to restart it. Immediately, press and hold the Command + Option + P + R keys simultaneously for around 20 seconds while your Mac restarts.
Step 3. Now, you will hear the system chime for the second time that will depict the PRAM has been restored on Mac. Let go of the keys now and wait as your Mac would be restarted with no issues.

Method 3: Get Rid of Locked Files from Trash
A while back, when I got the error 43 on Mac, I discovered it is because of the presence of some locked files in the Trash. If the files are locked or not accessible, then you can’t delete them, leading to the Finder error code 43 prompt. In this case, you can run the following code on Terminal and fix the macOS error code 43.
Step 1. Firstly, you need to launch a Terminal (as an administrator) on your Mac. For this, just go to its Finder > Applications > Utilities and launch Terminal.


Step 3. Once you have successfully processed the command, launch the Trash application on your Mac, and select all the files present in it by pressing the Command + A keys.
Step 4. This will just select all the files in the Trash folder. Now, just drag all files from Trash and drop them to the Terminal to get rid of them. You can also double click the Trash icon to wipe it as well.

Method 4: Forcefully Quit Finder
Finder is one of the most important components in Mac which is responsible for the way we interact with the system. Nevertheless, sometimes it might not get initialized correctly, leading to the Finder error code 43 in Mac. The good thing is that you can easily fix this issue by forcefully quitting the Finder.
Step 1. Just go to the upper-left corner of your screen, click on the Apple logo, and choose to Force Quit the Finder. Alternatively, you can also press the Option + Command + Esc keys at the same time.

Step 2. This will open the Force Quit application window on the screen. From here, you can just select Finder and click on the «Force Quit» button to close it forcefully.

Part 3: How to Recover Lost Data After Fixing Error Code 43?
Sometimes, while fixing the error code 43 in Mac, users end up losing their important files. For instance, the files that are locked could be deleted or you would have formatted the USB drive having some corrupt content. Well, if you have also lost your important files in the process, then you can take the assistance of Recoverit Data Recovery. The application can scan the internal hard disk of your Mac or any other external device for unforeseen data loss.
By following a simple click-through process, you can easily get back all kinds of lost content from the selected location. The tool supports every major kind of data like photos, videos, documents, music, compressed files, and so on. Besides that, it also lets us filter the results and even preview our files beforehand. To learn how to use Recoverit to get back your lost files in Mac, just follow this basic drill.
Step 1: Select a location to scan
Firstly, just launch the Recoverit application on your Mac by visiting Finder > Applications and simply select a location to scan from its home. You can pick the entire drive, a partition, or browse to select folders to scan. If you want, you can connect an external device to your Mac and select it from here.
Step 2: Sit back and hold on for a while
After selecting the target location, simply start the data recovery process and wait for the scan to be over. You can view the progress of the operation on the screen and even halt it in between.
If you want, you can also use the filter option of the tool to pinpoint the type of data you are looking for. There are different options to filter the results on the basis of file type, size, and more.
Step 3: Preview and save your data
After completing the process, you can also preview your files like photos, audios, documents, etc. on the interface. Presently, the application supports the preview of files of a maximum of 15 MB size. In the end, you can preview and select the files that you have lost and click on the «Recover» button to get them back.
While the first scan would be able to meet your requirements, you can also run an advanced video recovery process if you want to from here.
Part 4: How to Avoid Error Code 43 from Appearing on Mac?
Now when you know how to fix the error 43 on Mac, you would easily be able to use your Mac without any hassle. Though, if you don’t want to encounter the error code 43 on Mac again, then consider following these suggestions.
This brings us to the end of this extensive guide on what is error code 43 and how to fix it. As you can see, the error code 43 on Mac can happen due to numerous reasons that I have discussed here. Also, I have come up with different ways to fix the macOS error code 43 that you can implement without any technical hassle. Lastly, if you have lost your data while fixing the error 43 on Mac, then consider using a reliable application like Recoverit Data Recovery. Trusted by professionals, it will let you get back your lost data under different scenarios without any trouble.
Как проверить и исправить ошибки жесткого диска (HDD, SDD) на Mac
Ваш Mac не включается? Без паники! Не спешите бросать всё и нести любимый компьютер в ближайший сервис. Вполне возможно, что для «реанимации» хватит и встроенных средств macOS, воспользоваться которыми может каждый желающий.

Загрузка в Безопасном режиме (Safe Mode) на Mac
При активации Safe Mode macOS просканирует жесткий диск и исправит все ошибки, которые найдет.
«Безопасная» загрузка запускает только жизненно необходимые компоненты (т. е. только то, что необходимо для запуска компьютера). В результате не будут запущены сторонние расширения, элементы входа в систему (логины-пароли), а также будет очищен кэш в определенных разделах.
Чтобы запустить Mac в режиме Safe Mode, выключите его, затем включите и одновременно со стартовым звуком зажмите на клавиатуре клавишу ⇧Shift. Если ваш Mac завис при включении, сначала выключите его (для этого удерживайте физическую кнопку питания на корпусе или клавиатуре в течение 10 секунд).

Если Mac загрузил систему, перезагрузите его и включайте уже как обычно. Если же компьютер вновь завис, переведите его в Verbose Mode — для этого необходимо выключить Mac, включить его и после стартового сигнала одновременно нажать и удерживать ⌘Cmd + V. Так вы сможете узнать, какой именно системный компонент приводит к проблеме. Когда источник будет выявлен, можно перезагрузиться в Safe Mode (с зажатой клавишей ⇧Shift) и удалить проблемное расширение, после чего попробовать уже обычную перезагрузку.
2. Режим восстановления и Первая помощь на Mac
Если безопасный режим не решил вашу проблему, переходим к следующей опции под названием Режим восстановления (Recovery Mode). Он «живёт» в отдельной части загрузочного диска и позволяет восстанавливать систему, получать доступ к Терминалу и возможность переустановить операционную систему вашего Mac — macOS.
Для перехода в Режим восстановления:
1. Выключите компьютер;
3. Сразу же после стартового сигнала нажмите и удерживайте сочетание клавиш ⌘Cmd + R.

Если перейти в Recovery Mode не удается (при проблемах с диском такое бывает), можно запустить режим восстановления через интернет. Сочетание клавиш будет уже несколько другим — ⌘Cmd + ⌥Option (Alt) + R. Этот способ требует интернет-подключения и займет гораздо больше времени, т. к. macOS будет загружать из Сети образ системы весом в несколько гигабайт.
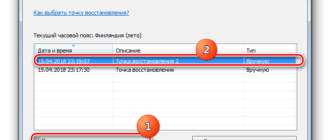
Если загрузка в Режим восстановления прошла успешно, вы увидите несколько вариантов действий. Запустите Дисковую утилиту и найдите загрузочный диск, который является источником проблем — скорее всего, он называется Macintosh HD. Выберите его в окне слева, а затем нажмите Первая помощь → Запустить.

Проверка fsck
File system consistency check (fsck, «проверка целостности файловой системы») — старый добрый Unix-инструмент для проверки и решения проблем с дисками.
В зависимости от объема жесткого диска, его типа и серьезности проблемы fsck-проверка может занять довольно много времени. Просто наберитесь терпения.
Для запуска fsck необходим переход в однопользовательский режим (Single User Mode). Он позволяет вносить изменения в общие пользовательские ресурсы на компьютере. Single User Mode не запускает macOS; он просто дает доступ к командной строке Unix.
Для перехода в Single User Mode:
3. Сразу после стартового сигнала нажмите и удерживайте сочетание клавиш ⌘Cmd + S.

Примечание: если ваш диск зашифрован, выберите подходящий пользовательский аккаунт и введите пароль для дешифровки. Если у вас установлен пароль на прошивку Mac, запустить Single User Mode не получится.
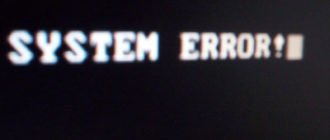
Важно дождаться окончания fsck-проверки — если процесс будет прерван, возможна потеря данных. После окончания проверки вы увидите одно из следующих сообщений:
** The volume Macintosh HD could not be repaired.
*****The volume was modified *****
** The volume Macintosh HD was repaired successfully.
*****The volume was modified *****
Уже намного лучше… но расслабляться рано. Опять-таки, запустите проверку еще раз.
** The volume Macintosh HD appears to be OK.
А вот это — то, что нам нужно. fsck проверила весь диск и не нашла ничего, что требовало бы исправлений.

Теперь из Single User Mode можно выходить. Команда для выхода: exit.
Apple Diagnostics
Если описанные выше способы вам не помогли, то проблема почти наверняка очень серьезная. А это значит, что пришло время воспользоваться Apple Diagnostics!
Это специальный тест для компьютеров Mac от компании-производителя. По его итогам вы получите код ошибки и сможете понять, что именно не так с вашим Mac.
Для запуска теста Apple Diagnostics:
1. Выключите ваш Mac;
2. Отключите от него все подключенные устройства, за исключение клавиатуры, мышки, монитора, Ethernet-кабеля (если есть) и кабеля питания. Иными словами, отключите флешки, внешние жесткие диски, принтеры, сканеры и т. п.
4. Сразу же после стартового сигнала нажмите и удерживайте на клавиатуре D.
5. Выберите свой язык
Как уже упоминалось выше, после прохождения теста вы получите в свое распоряжение код ошибки. Расшифровка кодов:
Как видим, проблемы делятся на две категории — те, которые легко устранит и рядовой пользователь (например, ошибки, связанные с USB), и те, с которыми надо сразу идти в сервис (к примеру, неполадки с видео — и аудиокартами, процессором, памятью и т. д.).
Восстановление файлов с поврежденного диска
Повреждение жесткого диска среди прочего означает и возможную потерю данных (или их части). Для того, чтобы избежать этого, попробуйте создать образ «сломавшегося» диска. Для этого потребуется внешний жесткий диск как минимум того же объема.
1. Подключите его к Mac, перезагрузите компьютер,
2. Войдите в Recovery Mode (⌘Cmd + R),
3. Запустите Дисковую утилиту,
4. В строке меню вверху выберите Файл → Новый образ → Образ «Macintosh HD» и запустите процесс. На создание образа уйдет какое-то время, но в конце вы получите копию старого диска в формате DMG и сможете его смонтировать уже в новой системе.

Не забудьте сменить [username] на свое имя пользователя в системе.
Давайте разберем команду: cp — это команда на копирование, —r означает, что эта команда выполняется рекурсивно, т. е. сначала копируются директории внутри указанной вами директории, а затем директории, которые входят в их состав, и так далее.
Первый путь — это указание на местонахождение файлов, которые вы хотите скопировать. Второй путь указывает местоположение внешнего накопителя, он всегда будет в /Volumes/, какое бы название вы ему ни дали.
Единственная сложность этого способа — вы должны вспомнить, где именно находились ваши файлы, и соответствующим образом прописать путь. Также вам остается только надеяться на то, что файлы не находятся на поврежденной части диска.
Когда копирование данных будет завершено, вы можете с чистой совестью отдать Mac в ремонт или переустановить macOS.
… Именно в такие моменты люди начинают понимать важность резервного копирования данных. И действительно — при настроенном копировании Time Machine проблемы с потерей данных не страшны. Настройте копирование данных прямо сейчас — и сэкономьте себе много времени, нервов и денег в будущем!
https://recoverit. wondershare. com/mac-tips/error-code-43-mac. html
https://yablyk. com/887075-kak-proverit-i-ispravit-oshibki-nakopitelya-hdd-sdd-na-mac/